Using norlab_icp_mapper in ROS
If you want to use norlab_icp_mapper in ROS or ROS 2, you can will need to install few more dependencies:
- libpointmatcher_ros allows the conversion of pointclouds from ROS message formats to a libpointmatcher-compatible format.
- norlab_icp_mapper_ros is a bridge between the mapper and ROS and provides a mapping node that is already functional and that can be customized using YAML configuration files to suite your needs.
Tutorial
This tutorial is based on a 3D Mapping tutorial created by Simon-Pierre Deschênes (Thanks 🎉).
Warning
Note that the ROS 1 version of this tutorial is not longer maintained. Some example launch files and configuration can be found here.
Copying the demonstration data
Assuming you completed the Example: building a map from lidar scans tutorial, we will now process ROS bag files. Download the demonstration data using:
TODO
cd ~/
wget -O demo.zip "http://norlab.s3.valeria.science/demo.zip?AWSAccessKeyId=XMBLP3A0338XN5LASKV2&Expires=2290342833&Signature=NXn1f%2BeJ7NptrzUkNzHtEvdicjc%3D"
unzip demo.zip
rm demo.zip
Fetching libpointmatcher_ros
cd ~/
mkdir -p catkin_ws/src && cd catkin_ws/src/
git clone -b melodic https://github.com/norlab-ulaval/libpointmatcher_ros.git
cd ~/
mkdir -p ros2_ws/src && cd ros2_ws/src/
git clone https://github.com/norlab-ulaval/libpointmatcher_ros.git
Fetching norlab_icp_mapper_ros
cd ~/catkin_ws/src/
git clone -b melodic https://github.com/norlab-ulaval/norlab_icp_mapper_ros.git
cd ~/ros2_ws/src/
git clone https://github.com/norlab-ulaval/norlab_icp_mapper_ros.git
Compiling ros workspace
cd ~/catkin_ws/
catkin_make
cd ~/ros2_ws/
colcon build --symlink-install
source ~/ros2_ws/install/setup.bash
Mapping basics
Behind the scenes
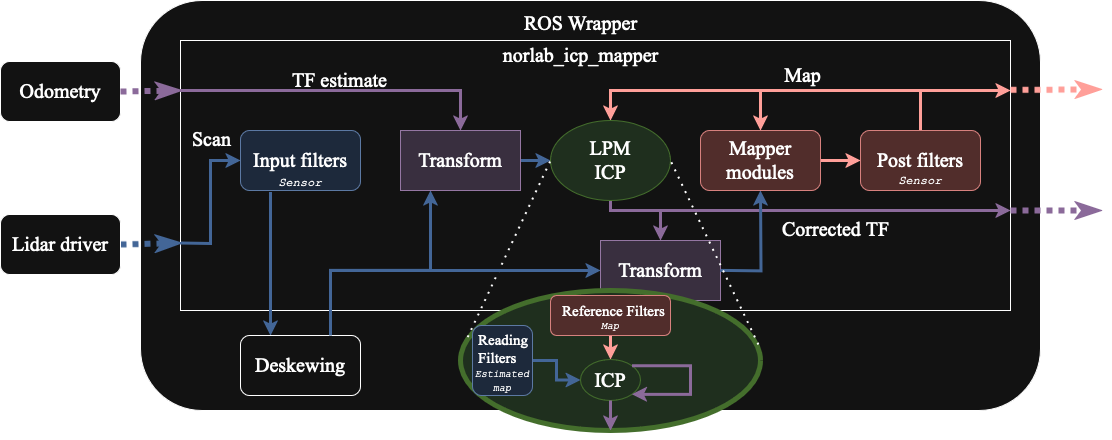
Behind the scenes, the mapper node takes a lidar point cloud, registers it in the existing map using libpointmatcher and add it at the right place in the map. All of this is done while keeping track of the pose of the robot. During this process, some filters are applied on point clouds before and after map updates. Furthermore, between map updates (slow), the mapper continuously localizes the robot in the map (fast) to ensure good localization at all times.
Configuration files
The mapper configuration template params/config.yaml contains four important sections :
- ICP parameters used by libpointmatcher to do the registration of new point clouds in the map.
- Input filters which are applied to the new point clouds before being processed.
- Post-processing filters which are applied to the map after adding the new point cloud.
- Mapper parameters that configure the mapper's update condition and MapperModules.
See How to configure the Mapper guide for more details.
Finally, the ROS launch file is located in launch/mapper.launch for ROS and launch/mapper.launch.py for ROS 2.

Running the demo
roscore
rosparam set use_sim_time true
roslaunch mapper_config_template mapper.launch
rviz -d ~/demo/config.rviz
rosbag play ~/demo/demo.bag --clock --keep-alive
ros2 launch mapper_config_template mapper.launch.py
rviz2 -d ~/demo/config.rviz
ros2 bag play ~/demo/demo --clock

Adjusting mapping parameters
Lowering the map density
Open the file mapper.config and change the following parameter:
PointDistanceMapperModule:
  minDistNewPoint: 0.1 -> 1.0
Changing the map update condition
Open the file mapper.config and change the following parameters:
updateCondition:
  type: overlap -> distance
  value: 0.5 -> 1.0
Removing points reflected from the robot's chassis
Open the file mapper.config and add the following lines in the input section:
- BoundingBoxDataPointsFilter:
    xMin: -1.5
    xMax: 0.5
    yMin: -1
    yMax: 1
    zMin: -1
    zMax: 0.5
    removeInside: 1
Removing pedestrian following the robot closely behind
Open the file mapper.config and add the following lines in the input section:
- BoundingBoxDataPointsFilter:
    xMin: -6
    xMax: -1.5
    yMin: -2.5
    yMax: 2.5
    zMin: -1
    zMax: 1
    removeInside: 1
Removing dynamic points
Open the file mapper.config and add the following lines in the post section:
- SurfaceNormalDataPointsFilter:
    knn: 10

- CutAtDescriptorThresholdDataPointsFilter:
    descName: probabilityDynamic
    useLargerThan: 1
    threshold: 0.65
Then change the following MapperModule in the mapperModule portion of the mapper section:
DynamicPointsMapperModule:
  thresholdDynamic: 0.65
  alpha: 0.2
  beta: 0.99
  beamHalfAngle: 0.01
  epsilonA: 0.01
  epsilonD: 0.01
Deskewing the input point cloud
Unlike the other mapping modules, deskewing is part of the ROS 2 wrapper norlab_icp_mapper_ros.
This is due to the fact that deskewing requires TF2 interpolations which must happen inside the ROS ecosystem.
To enable deskewing, set the deskewparameter to truein the mapper.launch.py file:
"compression_voxel_size": 0.2,
"deskew": False -> True,
Moreover, you can adjust the deskewing behavior by changing these two parameters:
expected_unique_deskewing_TF_number: defines the number of unique TFs that are expected to be used for deskewing. This number is used to prealocated memory space in a hash map and while an incorrect value might cause slowdowns, it is not that important.deskewing_round_to_nanosecs: defines the time resolution at which the deskewing TFs are rounded. This is used to reduce the number of TFs that are queried from the TF buffer. A value of 50000 means that the TFs are rounded to the nearest 50 microseconds.
Changing the map's topic density
The ROS wrapper publishes the map on the /map topic, given that there exists at least one active subscriber.
As the map messages can get relatively large, especially when visualizating over a remote connection, the map message is downsampled with a voxel-based octree approach.
The parameter controlling this behaviour is dynamic and can be modified when mapping using the compression_voxel_size parameter.
The default value is set to 0.5.
Try launching the following command to get show a denser map:
TODO
ros2 param set /mapper_node/compression_voxel_size 0.05
Saving the map
You can save the map by calling the /save_map service. Similarly, use the /save_trajectory service to save the trajectory.
rosservice call /save_map "map_file_name: data: '$HOME/demo/demo.vtk'"
ros2 service call /save_map norlab_icp_mapper_ros/srv/SaveMap "{map_file_name: {data: '$HOME/demo/demo.vtk'}}"
Final Result
You can visualize the final result in ParaView or other point cloud viewer of your choice.
